
 I am a bit biased as a biology technician because plants are awesome and they don’t often get the recognition they deserve when it comes to science practical work. This is often because the plants “don’t work” or the practicals are seen as “boring”, when in reality they can be very engaging and cost effective.
Here at STEM Learning and others, such as Science and Plants for Schools (SAPS), we try to encourage teachers and technicians to use plant practicals to show key scientific principles, such as photosynthesis, cell division, transpiration, disease, cell structure, growth and many more.
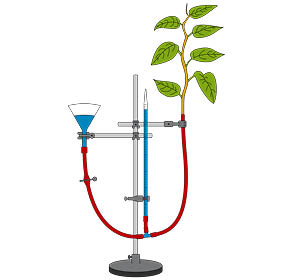
One of those key topics in transpiration (the process of water moving though a plant and its evaporation from stems and leaves) has long been the bane of teachers and technicians, as it uses the dreaded potometer! This device is used to measure the uptake of water in a leafy plant, which is driven by transpiration (and photosynthesis as well) and when working you can see the plant taking up water at varying rates depending on environmental conditions (which you can change and investigate).
The problem is that potometers can be really difficult to get to work and also for students to see the uptake of water. In this video we have produced, we will show how to successfully set up a Ganongs potometer and a very simple student one as well.
Here are some key tips to getting your potometer (should be the same for any type) to work:
- Make sure you have a good seal around your plant sample (this is the biggest problem), the first step is to make sure that the plant sample is slightly wider than the tubing or bung it’s going into. We also use petroleum jelly to create an extra seal around the plant and the tubing.
- The potomter needs to be completely full of water, you might find that it is easier to fill and insert the plant under water (depending on type).
- The plant needs to be cut at the stem base by around 1-2cm before inserting to get rid of any air bubbles. You could also cut it underwater and keep it underwater if you’re worried about the time the stem will be in the air (if you can do it quickly this shouldn’t be a problem).
- Woody stems are best as you can shove them into the tubing or bung. We use Laurel but privet is also suitable. If it’s a cold day collect your plants earlier and keep them indoors in a beaker of water. This will mean that the plant will be a bit speedier when used.
- Use food colouring in the capillary tubing to make it easier for pupils to see the changes in rate of water uptake.
We hope you enjoy the video and that it helps you to successfully set up a potometer.
Related resources